
In this post, we are going to learn how to play HD Movies and Videos with Unsupported Audio Format on Televisions in two approaches. The tools which we are going to use are Avidemux for approach one, Pazera and MKV Toolnix for the second approach.

We can play the audio of HD videos by converting them to one of the supported formats by TVs. Above two approaches helps in converting the audio format of any videos without changing the quality of the video. The best part about these tools is they are open source, which means FREE.
Before getting into the details, first, let us understand why the audio format is not supported on televisions. Most of the devices do not support videos with audio codecs likewise AC3 or DTS etc.; even though they are recently purchased. The reason behind this is, the codecs which you are trying to play are having patents. And a commercial license needs to be paid in order to decode them.
Is it mandatory to purchase those codecs? No, of course not. Some companies may choose the option of not paying and do not support them. On the other hand, they go supporting AAC format audio codec which requires no license to stream or distribute the content.
Now let us get into the process. It is simple and fast since there is no need to modify the video.
Approach 1: Using Avidemux to solve Unsupported Audio Format on Television.
How to use Avidemux?
- Download and install Avidemux software.
- Open the file which you want to convert in Avidemux by going to Menu -> File and select open or simply drag and drop.
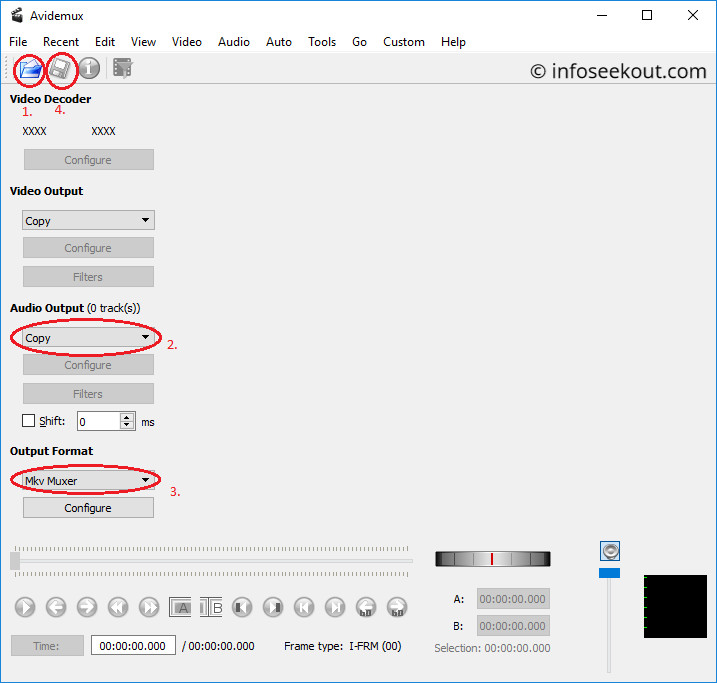
- Do NOT select any option under “Video Output” as we are not changing/encoding the video quality of a file.
- Choose AC-3 (lav) or AAC (Faac) option from the drop-down menu under “Audio Output” on the left-hand side.
- Under Output Format choose either MKV muxer or AVI muxer or MP4 muxer based on your original file extension. For example, choose MP4 muxer if the original file is with MP4 extension etc.
- Next, click on the save button.
- Enter the file name and destination for saving the converted file.
- That’s it. Encoding of audio format starts and gets completed depending upon your system configuration.
Approach 2: Using Pazera Audio Extractor & MKV Toolnix to solve Unsupported Audio Format on Television.
How to use Pazera Audio Extractor?

- Download and install the Pazera Audio Extractor tool, MKV ToolNix tool.
- Open the file which you want to convert by clicking Add Files button or simply drag and drop the file.
- Select the output format likewise AAC – ADTS.
- Choose the Output directory. This is the location where your extracted audio will be stored.
- Finally, click on the convert button. Pazera audio extractor now extracts the audio from video file and stores the audio in your selected output format.
How to use Mkvtoolnix?

- Open the MKV ToolNix software and load the video file by clicking Add source files or drag and drop video.
- Once the video file has been loaded into MKV ToolNix, it displays the Tracks, chapter, and tags for that file.
- Now, load the extracted audio format into MKV ToolNix which is extracted from Pazera Audio Extractor.
- MKV ToolNix software now shows three or more files (Video file + Default Audio Output + Extracted Audio Output).
- Deselect or uncheck the default Audio Output format and leave the other things unchanged.
- Now, choose the destination file name and location of the new file.
- Finally, click on “Start multiplexing”.
- That’s all. Now, the video files will play on your TV without the warning Unsupported Audio Format.
Conclusion: Why approach 2 when approach 1 is easier?
When compared with approach 2, approach 1 is much easier. But, still why approach 2? It’s true that Avidemux can do the audio conversion of a file easily. But, the drawback of it is, the tool hangs up if you try to load a video file of very large in size. In such cases, you can go for approach 2.
Also Read:
Leave a Reply